We were asked to create a second negative space project that reflected our personalities. I chose a picture of me doing a cartwheel and replaced the original image with a swimming pool pattern. I replaced the original background with some sand. I added a word poem from wordle.net that reflected my personality. I added the drop shadow and bevel-emboss effect. Finally I added a floral border.
Friday, February 25, 2011
Negative Space: Hawk
For this project, we were asked to use an image to create negative space as opposed to a detailed object, as well as incorporate text into the final product. I chose to use a hawk. First, I replaced the original hawk with a sky during sunset and added a brush stroke to make it stand out more. I also placed a gradient overlay on the hawk to increase the dramatic effect. Then, I added a daytime sky as the background. I found a haiku online about a hawk and added it to the background. Finally, I created a word collage using wordle.net and placed it within the hawk.
Friday, February 18, 2011
Crazy Combo
For this project, we were asked to create a crazy hybrid creature using parts of many different images to create a finished product. I used a zebra body to start out with. Then I added elephant legs, a cheetah tail, swan wings, a giraffe head, cat eyes, and donkey ears. I used the eraser tool a lot, often accompanied by the new refine edges feature in Photoshop CS5. I used the puppet warp feature to bend the elephant legs, the cheetah tail, and the giraffe head. Finally, I added the background and the text and adjusted the size of my creature, the "Africanimal".
Friday, February 11, 2011
Renaissance Woman
To create this image, I used a Renaissance portrait that I found on google and replaced the original face with my own. First, I had to carefully cut out my face. Then, I had to texturize the picture of my face to make it match the texture of the painting. Finally, I had to adjust my skin tone to match the skin tone of the woman in the painting. This was the most difficult part. Overall, I am satisfied with the way the portrait turned out.
Thursday, February 10, 2011
15 Green Things
For this project, we were given fifteen green objects and had to arrange and manipulate them in a way that we found interesting. The primary tool I used in this project was the color replacement tool. I also used scaling, skewing, and rotating to arrange the images. I adjusted the opacity on many of the images. When working on this project, I took a more realistic approach, as opposed to abstract.
Friday, February 4, 2011
Background Replacement
We took a short trip to China in Digital Imaging today! Just kidding. I created this image in Photoshop CS5 by replacing the original background with a picture of the Great Wall of China. I used the magnetic lasso tool to erase the first background and then used the eraser to touch up some bumpy edges. Then I added the Great Wall as a layer behind the people. Finally, I lightened the people so that they would look more natural in the lighting of the background.
Tuesday, February 1, 2011
Music Project
We were given a set of images and manipulated them by using various tools in Adobe Photoshop CS5. I rotated the music notes and rearranged the object layout to make the image balanced. I changed the appearance of the colored stripes by using the eraser tool. I applied a filter to the musicians and the music notes to give them an interesting, different texture. I posterized the image to increase the contrast and brightness of the image. Overall, I am satisfied with the way the image turned out.
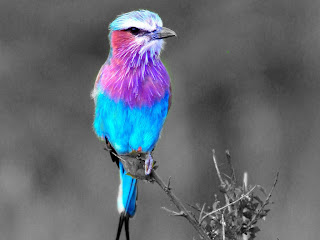
History Brush: Bird
I created this edited image by using the history brush in Adobe Photoshop CS5. First, I desaturated the image and then I used the history brush tool to add the color back to only the bird to make it stand out. The bright colors of the bird make it a perfect image to experiment on with the history brush tool.
Subscribe to:
Comments (Atom)


